Evacuation Planner Tutorial & How To
Evacuation Planner is a useful tool for drawing up safety plans for evacuation from any building. Industry safety standards require every public or private building to have a reliable evacuation plan. It ensures that if any emergency occurs, the people in the building do not have to scramble to figure out an escape route. Not having a solid plan poses a severe danger to lives, often even fatal. A plain image editor does not have the tools and components necessary to draw up a method following ISO standards. This is where the Evacuation Planner software comes handy.
Tools available to create your escape plan
Let us look at all the tools that the Planner provides to a user.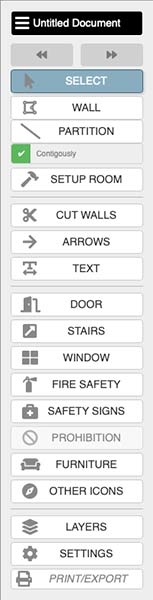
- Select allows you to choose one of the components on the Planner blueprint
- Wall allows you to create a new wall
- Partition lets you draw a new partition, which is not a wall. This could denote a glass, plywood, vinyl, or another barrier.
- Contiguously can be checked to allow drawing walls or partitions at a go from the end of the last one drawn
- Set Up Room lets you represent a set of walls as a room
- Cut Walls allows you to divide a wall and create two walls at the cutting point
- Arrows lets you draw arrows in the plan to guide people to follow a route
- Text lets you add writings for clarifications or special instructions
- The door allows you to add an entry to a room
- Window lets you add a window
- Stairs are used to put stairs between two different levels or floors
- Fire Safety has the set of all signs to denote fire safety instruments
- Safety Signs include medical safety, access, and mobility signs
- Prohibition contains prohibitory symbols, as the name itself suggests
- Furniture can be used to add pieces of furniture that are placed around the building for a more layered plan
- Other Icons has miscellaneous signs like parking, disabled access, eating area, telephone, arrows, plants, and so on
- Full-Screen Settings has two buttons, out of which the first expands the Planner to full screen while the second collapses it to the webpage view
- Layers allow you to selectively view the arrows, textures, measurements, and surfaces for better operation
- Settings let you change the measurement unit and the grid view.
- Print/Export opens the print manager to set the image section and scaling and paper size. Offers PNG export option.
How to use the free ecacuation planner?
To use the Evacuation Planner, open the site evacuation-planner.com in your browser. Sign up in case you do not have an account, else login. Use the various tools to create a floor plan of your building. Use the necessary symbols to create a good escape plan. Ensure there are backup plans, too, in case one route is blocked. Once done, save and export your plan or print it as pdf. Put it up at all key spots in your building.Conclusion
Evacuation Planner uses all ISO symbols and provides all standard components for creating a complete building blueprint and juxtaposing it with a working evacuation plan. The interface is user-friendly and intuitive, so even if you are a beginner, you will be able to operate it like a charm.